

![[Part 1 /3] A Full-Stack Expense Tracking App With Blazor, Web API & EF Core and SQL Server Express.](https://cdn.hashnode.com/res/hashnode/image/upload/v1676041799456/6e0b3c04-d4d7-4121-a29a-8595a9a3f2a1.png?w=1600&h=840&fit=crop&crop=entropy&auto=compress,format&format=webp)
[Part 1 /3] A Full-Stack Expense Tracking App With Blazor, Web API & EF Core and SQL Server Express.
Working API For Expense Tracking App


The app would provide a user with a way to keep a record of expenses.
NOTE: This tutorial uses .NET 6.0 (Long Term Support) and may not work the same for other versions.
Things you'll need (Prerequisites)
Visual Studio Installed
SQL Server Express Installed
Working knowledge of C#
GitHub Link
https://github.com/MarvinBotchway/BlazorExpenseTracker
Create New Project
Open Visual Studio and click
Create New ProjectSearch and select
Blazor Webassembly App-> press next- NOTE: Make sure its the option for C# and not F#
Name both the project and solution BlazorExpenseTracker -> press next.
Select
.NET 6.0 (Long Term Support).Authentication type None.
Make sure the
ASP.NET Core Hostedoption is ticked (This would add a Web API and Shared Project to the solution).Click Create.
Run the application to test if everything worked well.
If you see the default app without any error you are fine.
Add Swagger
Installing Swagger
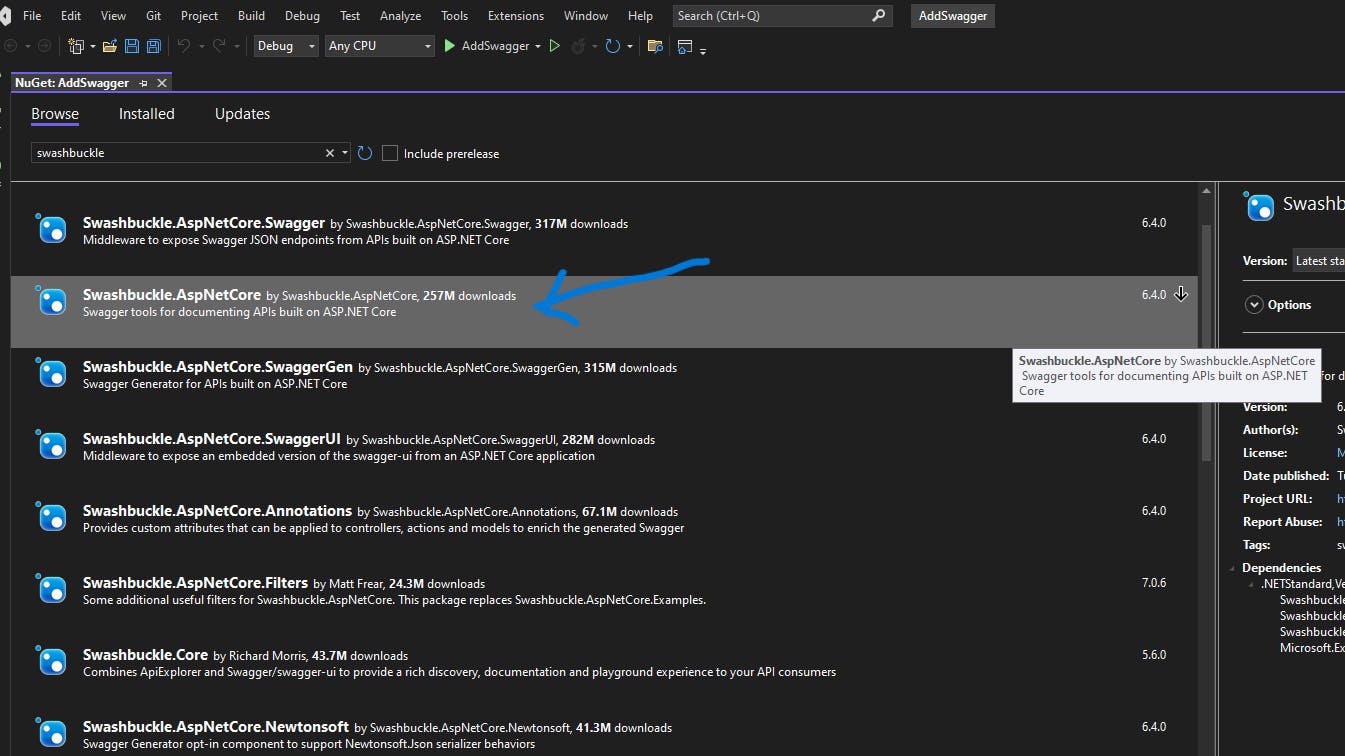
Right-click on
BlazorExpenseTracker.Server->Manage Nuget Packages...Make sure Browse is selected and search Swagger.
Select the package shown in the picture below
Swashbuckle.AspNetCoreand install.NOTE: Select a version starting with 6 like 6.4.0
Add and Configure Swagger Middleware.
In
BlazorExpenseTracker.Server/Program.csadd the Swagger generator to the services collection.Enable the middleware for serving the generated JSON document and also the Swagger UI.
Full BlazorExpenseTracker.Server/Program.cs File Below.
using Microsoft.AspNetCore.ResponseCompression;
using Microsoft.OpenApi.Models;

var builder = WebApplication.CreateBuilder(args);

// Add services to the container.

builder.Services.AddControllersWithViews();
builder.Services.AddRazorPages();

// Swagger - Add the Swagger generator to the services collection
builder.Services.AddSwaggerGen(option =>
{
    option.SwaggerDoc("v1", new OpenApiInfo { Title = "ExpenseNerd API", Version = "v1" });

});

var app = builder.Build();

// Configure the HTTP request pipeline.
if (app.Environment.IsDevelopment())
{
    app.UseWebAssemblyDebugging();

    // Swagger - Enable the middleware
    app.UseSwagger();
    app.UseSwaggerUI();
}
else
{
    app.UseExceptionHandler("/Error");
    // The default HSTS value is 30 days. You may want to change this for production scenarios, see https://aka.ms/aspnetcore-hsts.
    app.UseHsts();
}

app.UseHttpsRedirection();

app.UseBlazorFrameworkFiles();
app.UseStaticFiles();

app.UseRouting();


app.MapRazorPages();
app.MapControllers();
app.MapFallbackToFile("index.html");

app.Run();
Save and run the app.
Add
/swagger/index.htmlto the URL and press enter.
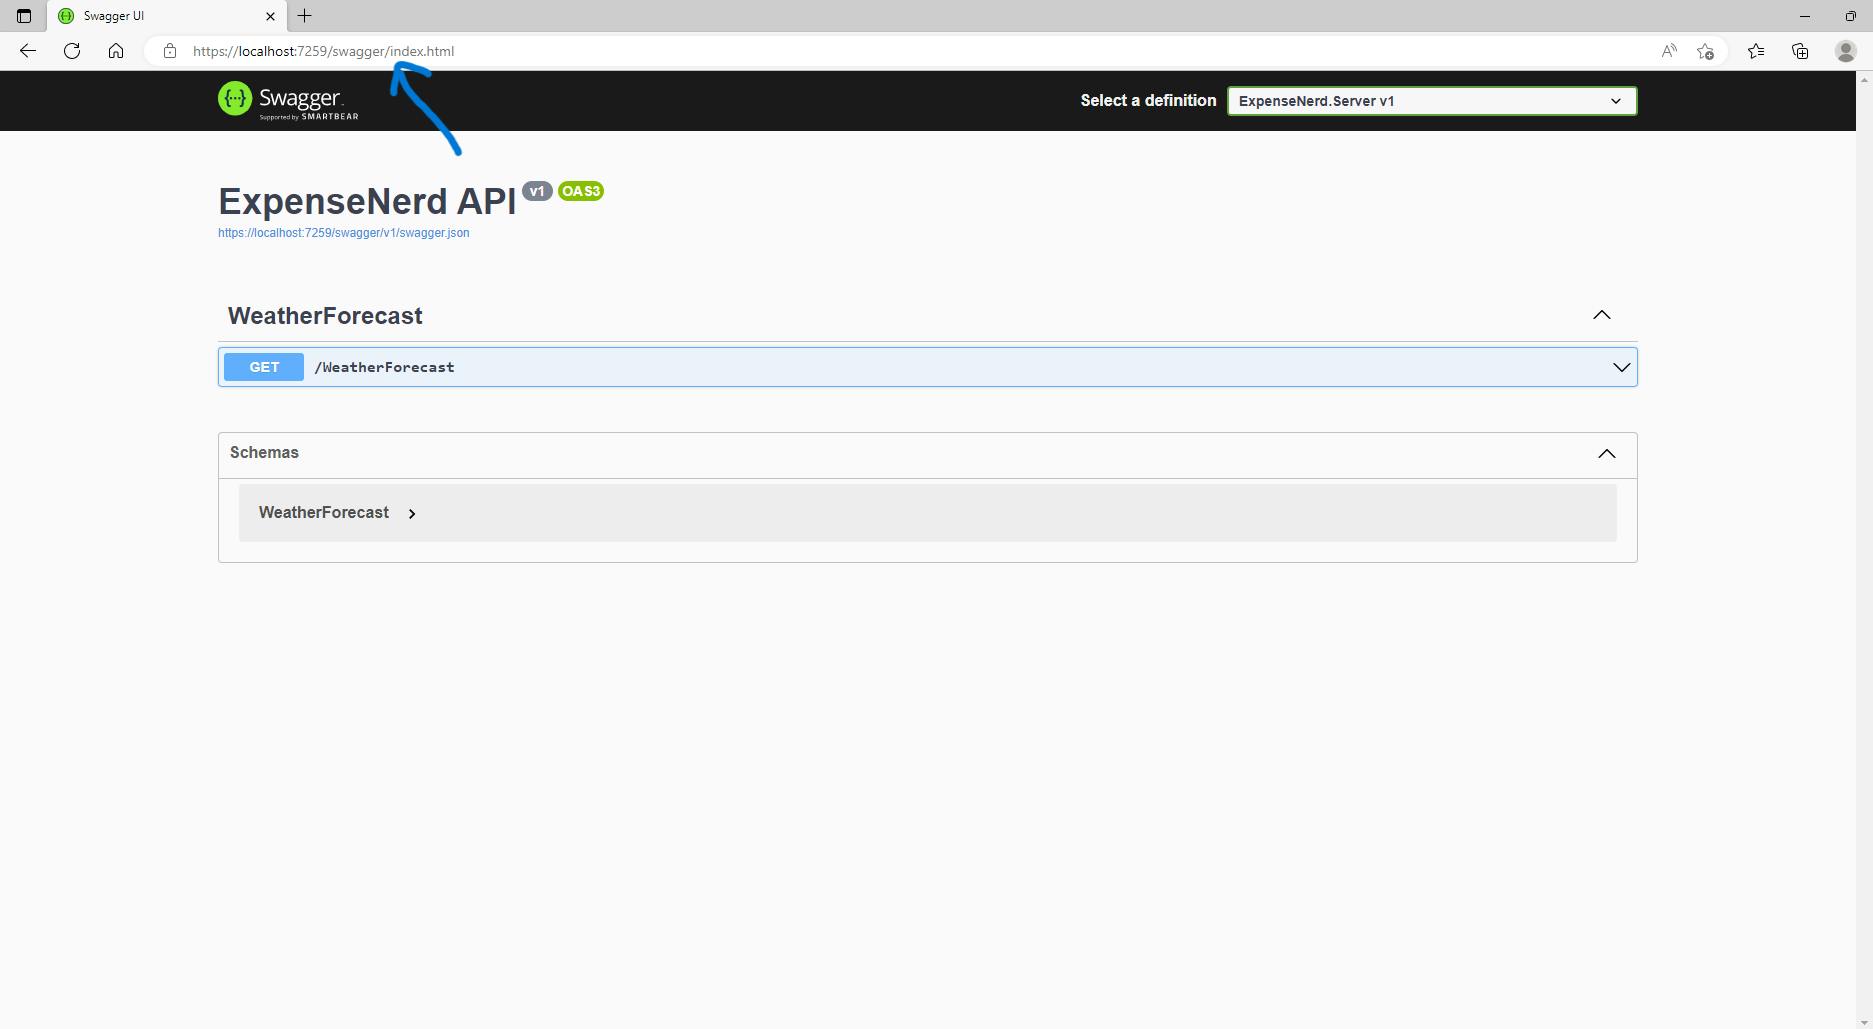
- You can see the default API endpoint
WeatherForcastshowing.
Add ExpenseModel
In
BlazorExpenseTracker.Sharedadd a new folder namedModels.In
BlazorExpenseTracker.Shared/Modelsadd a class and name itExpense.csChange the class modifier from internal to public.
Add the properties below.
using System;
using System.Collections.Generic;
using System.Linq;
using System.Text;
using System.Threading.Tasks;

namespace BlazorExpenseTracker.Shared.Models
{
    public class ExpenseModel
    {
        public int Id { get; set; }
        public decimal Amount { get; set; } = 0;
        public DateTime CreatedAt { get; set; }
    }
}
Add Database
Add Database Connection String
In BlazorExpenseTracker.Server/appsettings.json add "ConnectionStrings".
{
  // Database Connection String
  "ConnectionStrings": {
    "DefaultConnection": "server =localhost\\sqlexpress; database = BlazorExpenseTrackerDb; trusted_connection = true"
  },
  "Logging": {
    "LogLevel": {
      "Default": "Information",
      "Microsoft.AspNetCore": "Warning"
    }
  },
  "AllowedHosts": "*"
}
Install EF Core
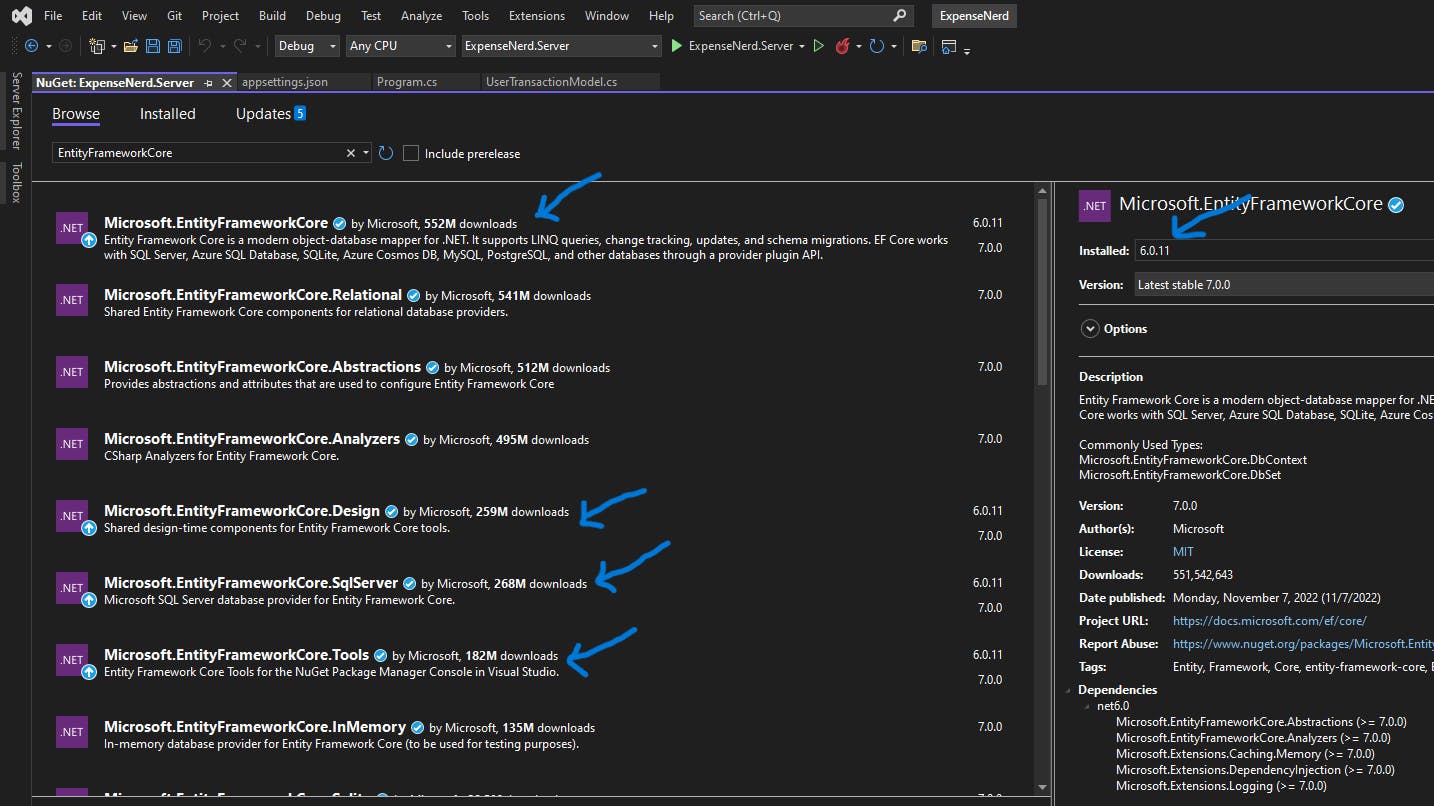
Right-click on
BlazorExpenseTracker.Serverand SelectManage Nuget Packages...Make sure Browse is selected and search EntityFrameworkCore.
Install the 4 EntityFrameworkCore packages shown below.
NOTE: Instal version 6.0.11 or it may not work well.
Add DbContext (DataContext)
Right-click on
BlazorExpenseTracker.Server-> Add a new folderData.Right-Click on the new folder
Datayou just created and add a classDataContext.cs.Let
DataContextInherit fromDbContextas shown below.
using Microsoft.EntityFrameworkCore;

namespace BlazorExpenseTracker.Server.Data
{
    public class DataContext : DbContext
    {
    }
}
Register DataContext
In BlazorExpenseTracker.Server/Program.cs register DataContext
using BlazorExpenseTracker.Server.Data;
using Microsoft.AspNetCore.ResponseCompression;
using Microsoft.EntityFrameworkCore;
using Microsoft.OpenApi.Models;

var builder = WebApplication.CreateBuilder(args);

// Add services to the container.

builder.Services.AddControllersWithViews();
builder.Services.AddRazorPages();

// Register DataContext
builder.Services.AddDbContext<DataContext>(options =>
{
    options.UseSqlServer(builder.Configuration.GetConnectionString("DefaultConnection"));
});

// Swagger - Add the Swagger generator to the services collection
builder.Services.AddSwaggerGen(option =>
{
    option.SwaggerDoc("v1", new OpenApiInfo { Title = "ExpenseNerd API", Version = "v1" });

});

var app = builder.Build();

// Configure the HTTP request pipeline.
if (app.Environment.IsDevelopment())
{
    app.UseWebAssemblyDebugging();

    // Swagger - Enable the middleware
    app.UseSwagger();
    app.UseSwaggerUI();
}
else
{
    app.UseExceptionHandler("/Error");
    // The default HSTS value is 30 days. You may want to change this for production scenarios, see https://aka.ms/aspnetcore-hsts.
    app.UseHsts();
}

app.UseHttpsRedirection();

app.UseBlazorFrameworkFiles();
app.UseStaticFiles();

app.UseRouting();


app.MapRazorPages();
app.MapControllers();
app.MapFallbackToFile("index.html");

app.Run();
Add Seed Data
In BlazorExpenseTracker.Server/Data/DataContext
using BlazorExpenseTracker.Shared.Models;
using Microsoft.EntityFrameworkCore;

namespace BlazorExpenseTracker.Server.Data
{
    public class DataContext : DbContext
    {
        public DataContext(DbContextOptions<DataContext> options) : base(options)
        {

        }

        protected override void OnModelCreating(ModelBuilder modelBuilder)
        {
            modelBuilder.Entity<ExpenseModel>().HasData
            (
                new ExpenseModel()
                {
                    Id = 1,
                    Amount = 10.0M,
                    CreatedAt = DateTime.UtcNow
                },
                new ExpenseModel()
                {
                    Id = 2,
                    Amount = 100.0M,
                    CreatedAt = DateTime.UtcNow.AddHours(1)
                }
                , new ExpenseModel()
                {
                    Id = 3,
                    Amount = 0.0M,
                    CreatedAt = DateTime.UtcNow.AddHours(2)
                }

            );


        }

        public DbSet<ExpenseModel> Expenses { get; set; }
    }
}
Add Migrations
- Open Package Manager Console
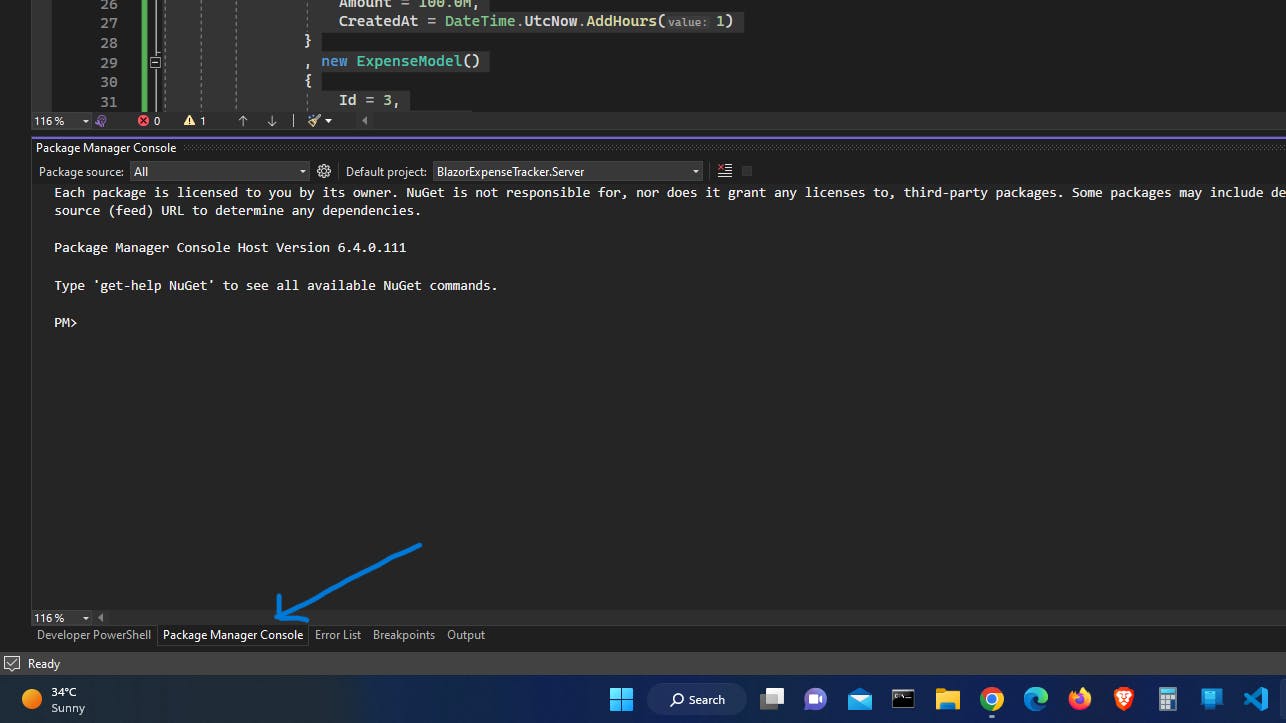
- Enter the following commands
cd .\BlazorExpenseTracker\Server
- Change current folder to .\BlazorExpenseTracker\Server with the command above.
Add-Migration InitialSeedData
- Add the first migration and name it
InitialSeedDataas above.
Update-Database
- Create/Update the Database.
Update ExpenseModel.cs
In BlazorExpenseTracker.Shared/models/ExpenseModel.cs
Add 2 properties Title and Description
Add an attribute to Amount to remove the warning when adding migration.
using System;
using System.Collections.Generic;
using System.ComponentModel.DataAnnotations;
using System.ComponentModel.DataAnnotations.Schema;
using System.Linq;
using System.Text;
using System.Threading.Tasks;

namespace BlazorExpenseTracker.Shared.Models
{
    public class ExpenseModel
    {
        public int Id { get; set; }
        public string Title { get; set; } = string.Empty;
        public string Description { get; set; } = string.Empty;

        [Column(TypeName = "decimal(18,4)")]
        public decimal Amount { get; set; } = 0.0M;
        public DateTime CreatedAt { get; set; }
    }
}
Using the package manager Add a Migration to make the change in the database
Add-Migration AddPresisonToAmount
Update-Database
Add Controller.
Right-Click on
BlazorExpenseTracker.Server/ControllersClick
Add -> Controller...At the left side of the dialogue click
API.
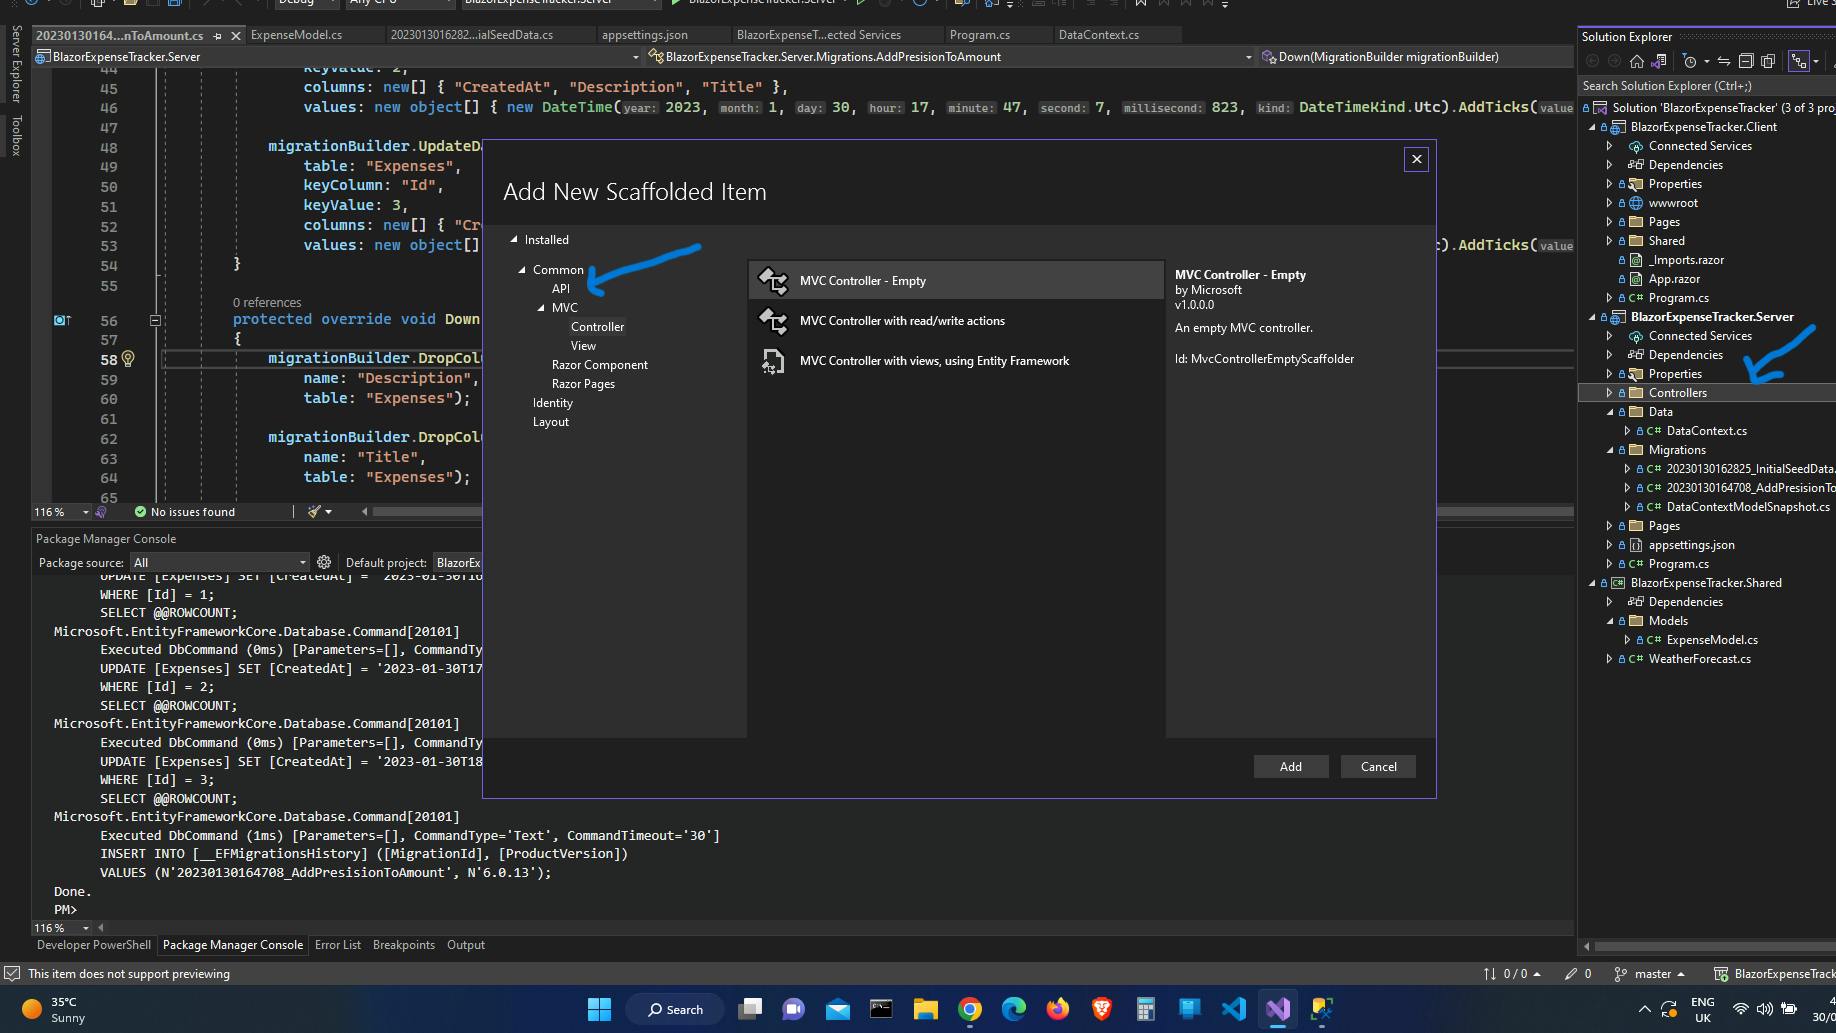
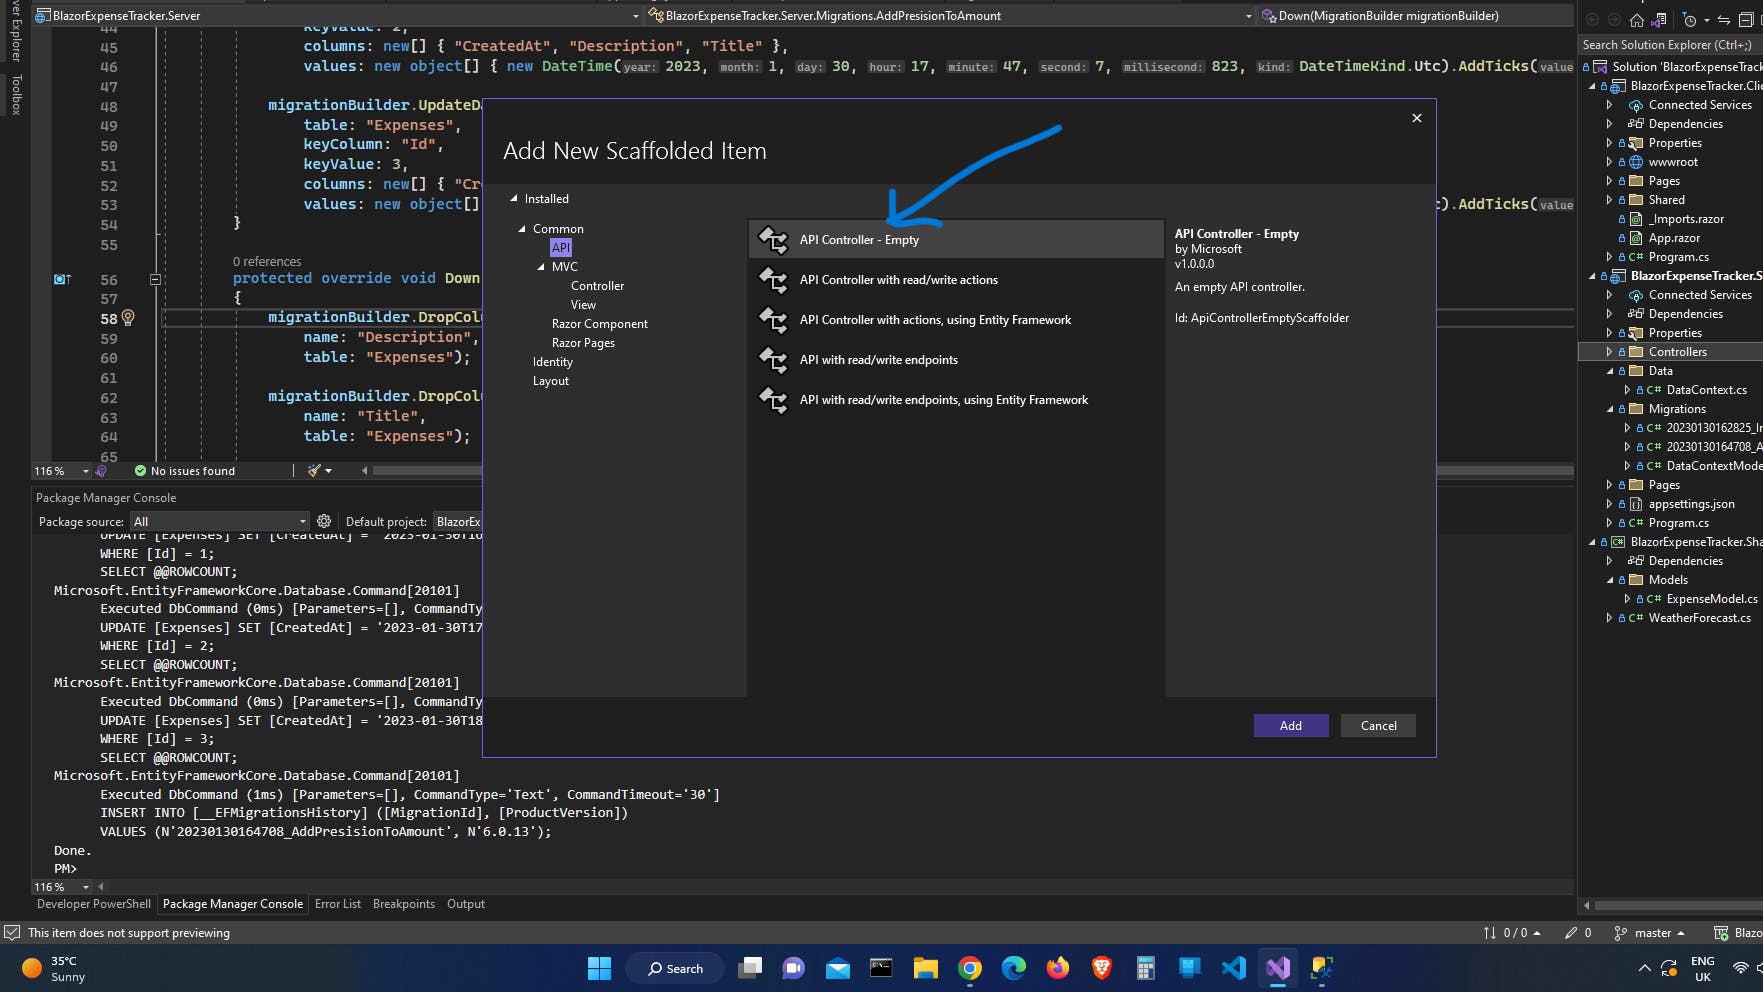
Select
API Controller - Empty.Click Add and name the controller
ExpenseController.cs.
Add a constructor with the
DataContext contextas a parameterAdd the field _context
Add functions for different API calls.
Run the app and go to swagger to view and test the API endpoints.
using BlazorExpenseTracker.Server.Data;
using BlazorExpenseTracker.Shared.Models;
using Microsoft.AspNetCore.Http;
using Microsoft.AspNetCore.Mvc;
using Microsoft.EntityFrameworkCore;

namespace BlazorExpenseTracker.Server.Controllers
{
    [Route("api/[controller]")]
    [ApiController]
    public class ExpenseController : ControllerBase
    {
        private readonly DataContext _context;

        public ExpenseController(DataContext context)
        {
            _context = context;
        }
        [HttpGet]
        public async Task<ActionResult<List<ExpenseModel>>> GetAllExpensesAsync()
        {
            var response = await _context.Expenses.ToListAsync();
            return Ok(response);
        }
        [HttpPost]
        public async Task<ActionResult<ExpenseModel>> CreateExpenseAsync(ExpenseModel expense)
        {
            var response = await _context.Expenses.AddAsync(expense);
            await _context.SaveChangesAsync();
            return Ok(response.Entity);

        }

        [HttpPut]
        [Route("{id}")]
        public async Task<ActionResult<ExpenseModel>> EditExpenseAsync(ExpenseModel expense, int id)
        {
            ExpenseModel? response = null;

            var DbExpense = await _context.Expenses.FirstOrDefaultAsync(e => e.Id == id);

            if (DbExpense != null)
            {
                DbExpense.Title = expense.Title;
                DbExpense.Description = expense.Description;
                DbExpense.Amount = expense.Amount;
                DbExpense.CreatedAt = expense.CreatedAt;


                await _context.SaveChangesAsync();

                response = DbExpense;
            }

            return Ok(response);

        }

        [HttpDelete]
        [Route("{id}")]
        public async Task RemoveExpense(int id)
        {
            var DbTransaction = await _context.Expenses.FirstOrDefaultAsync(e => e.Id == id);

            if (DbTransaction != null)
            {
                _context.Expenses.Remove(DbTransaction);

            }


            await _context.SaveChangesAsync();

        }
    }
}
Update SeedData
In BlazorExpenseTracker.Server/Data/DataContext Edit the seed data as below.
using BlazorExpenseTracker.Shared.Models;
using Microsoft.EntityFrameworkCore;

namespace BlazorExpenseTracker.Server.Data
{
    public class DataContext : DbContext
    {
        public DataContext(DbContextOptions<DataContext> options) : base(options)
        {

        }

        protected override void OnModelCreating(ModelBuilder modelBuilder)
        {
            modelBuilder.Entity<ExpenseModel>().HasData
            (
                new ExpenseModel()
                {
                    Id = 1,
                    Title= "Bought a Snack",
                    Description = "",
                    Amount = 10.0M,
                    CreatedAt = DateTime.UtcNow
                },
                new ExpenseModel()
                {
                    Id = 2,
                    Title = "Bought a phone",
                    Description = "",
                    Amount = 100.0M,
                    CreatedAt = DateTime.UtcNow.AddHours(1)
                }
                , new ExpenseModel()
                {
                    Id = 3,
                    Title = "Bought Lunch",
                    Description = "",
                    Amount = 20.0M,
                    CreatedAt = DateTime.UtcNow.AddHours(2)
                }

            );


        }

        public DbSet<ExpenseModel> Expenses { get; set; }
    }
}
Using the package manager Add a Migration to make the change in the database
Add-Migration AddTitleAndDescriptionToSeedData
Update-Database
Conclusion
We now have a working API capable of creating, reading and writing. Part 2 Continues from where we left off by adding services to the server project.